Why is JSX used?
JSX is Javascript -> with some added functionalities or benefits. In JSX we can add HTML or XML code which can be used to render elements. It’s great in terms of security wise because the react DOM escapes any data passed in JSX before rendering it & it prevents us to inject unsafe dynamic tags that was not defined in our application. -> no XSS attacks 😀
In WordPress, we are using webpack & babel while building our blocks -> to bundle the content into a single one and converting the JSX to normal JS.
Creating our First Block
To create a block in the WordPress we can use the package @wordpress/create-block, it is already there in our installation.
Blocks in WordPress are registered via Plugin so we will need a plugin file to register our blocks to the block editor.
Running this command in the plugins directory would give us a registered test block
npx @wordpress/create-block testblockThis would generate the files for the testblock plugin and register our testblock inside it. The structure of the testblock directory would look something like this
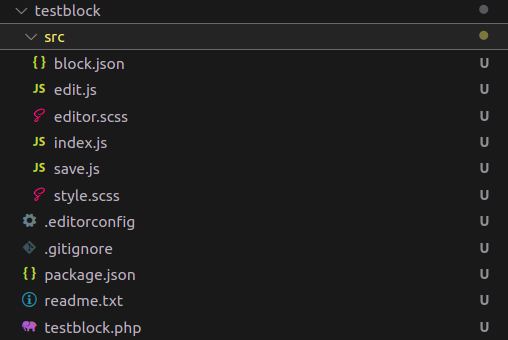
The src directory here contains the source files for our block where we can edit and define the behaviour of our blocks.
- block.json -> This setup the properties about our block, for e.g. name, icon etc.
- edit.js -> this contains the behaviour our block gives in the block editor [ backend-dashboard ]
- save.js -> this contains the behaviour our block gives when a saved block is rendered on the front end.
- index.js -> contains the mapping for the save and edit files in the block -> registered our block
Now this is the unbuilt version of the block -> this is not ready for production -> we need to perform the webpack and other tasks on the code.
Here comes the npm run build command in action.
On running this command it would generate the build folder for our block which would contain the main built files which are used to render the block in the wordpress.
These files will be used our plugin to register this block into the wordpress.
Registering the block through our plugin
To register the block through our plugin we must use the function register_block_type() function on the init hook.
function create_block_gutenpride_block_init() {
	register_block_type( __DIR__ . '/build' );
	register_block_type( __DIR__ . '/build2' );
}
add_action( 'init', 'create_block_gutenpride_block_init' );
We have to specify the path to the build directory in the first parameter of this function.
We can register multiple blocks from a same plugin by calling the register_block_type function multiple times.
Internally this function registers this block through the WP_Block_Type_Registry class. Which are stored under the registered_block_types property of this class.
Adding components to our block
We can use the components from the @wordpress/components package to add the control and other features to our block -> We can easily add settings and textboxes to our block using these controls.
import {
	useBlockProps,
	InspectorControls,
} from '@wordpress/block-editor';
import {
	PanelBody,
	TextControl,


} from '@wordpress/components';
This way we can import them and use them under our blocks
/**
 * Retrieves the translation of text.
 *
 * @see https://developer.wordpress.org/block-editor/reference-guides/packages/packages-i18n/
 */
import { __ } from '@wordpress/i18n';

/**
 * React hook that is used to mark the block wrapper element.
 * It provides all the necessary props like the class name.
 *
 * @see https://developer.wordpress.org/block-editor/reference-guides/packages/packages-block-editor/#useblockprops
 */
import {
	useBlockProps,
	InspectorControls,
} from '@wordpress/block-editor';

import {
	PanelBody,
	TextControl,


} from '@wordpress/components';

/**
 * Lets webpack process CSS, SASS or SCSS files referenced in JavaScript files.
 * Those files can contain any CSS code that gets applied to the editor.
 *
 * @see https://www.npmjs.com/package/@wordpress/scripts#using-css
 */
import './editor.scss';

/**
 * The edit function describes the structure of your block in the context of the
 * editor. This represents what the editor will render when the block is used.
 *
 * @see https://developer.wordpress.org/block-editor/reference-guides/block-api/block-edit-save/#edit
 *
 * @return {WPElement} Element to render.
 */
export default function Edit({ attributes, setAttributes }) {

	return (

		<p {...useBlockProps()}>
			<InspectorControls>
				<PanelBody
					title={__('Test settings', 'gutenpride')}

					initialOpen={true}
					icon='admin-appearance'
				>
					<TextControl
						label={__('Setting 1', 'gutenpride')}
						value={attributes.setting}
						onChange={(setting) => {
							console.log(setting)
							setAttributes({ setting });
						}
						}
					/>
					<TextControl
						label={__('Setting 2', 'gutenpride')}
						value={attributes.setting1}
						onChange={(setting1) => {
							console.log(setting1)
							setAttributes({ setting1});
						}
						}
					/>
					<TextControl
						label={__('Setting 2', 'gutenpride')}
						value={attributes.setting2}
						onChange={(setting) => {
							console.log(setting2)
							setAttributes({ setting2 });
						}
						}
					/>

				</PanelBody>


			</InspectorControls>
			{__('Gutenpride – hello from the editor!' + attributes.setting, 'gutenpride')}
		</p>
	);
}
This code would add 3 Textfields to the Block panel under the panel body Test Settings.
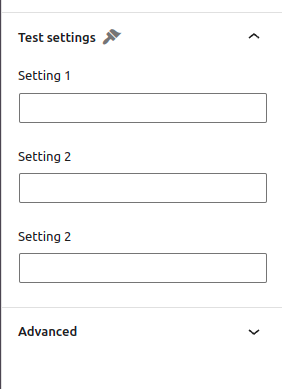
And we can use the values of them by adding the onChange parameter which would trigger the events when the value of these panels would be changed.
We can use this to modify the render design of our block.