WordPress VIP Go Platform
WordPress VIP Go is basically a hosting platform provided at WPVIP.com, this platform is much more efficient and scalable for the clients and is very performance driven.
The difference in installing a VIP Go platform is that the codebase of it [ not the actual wordpress codebase, just some structures ] is different from the usual WordPress installation codebase, mainly the structure of this is a bit different from the usual WordPress codebase structure.
The code for every application on the VIP Go platform is kept inside the Repo provided from @wpcomvip -> The repos are private and only admins have access to it to manage it via git.
The code for each application of the WordPress VIP is based on the VIP skeleton available at -> https://github.com/Automattic/vip-go-skeleton
The required directory and files structure is as follows:
- /client-mu-plugins -> The mu-plugin which the client wants to add.
- /config -> VIP configuration files
- /images -> static images
- /languages -> translations
- /plugins -> holds the client plugins
- /private -> private files
- /themes -> holds the client themes
- /vip-config -> wp config
/client-mu-plugins
On VIP platform we cannot access the /mu-plugins directly, instead VIP has provided us with /client-mu-plugins, here we can add the custom mu-plugins we need. Here the plugins added directly via the single file are loaded automatically, but the plugins which are added in the sub-directory needs to be loaded via the client-mu-plugins/plugin-loader.php file
Here are the VIP configuration files stored, these files are in the .yml extension, these are the domain mapping files which contain the information about the domain mappings on the VIP platform, these are named in the format .vip.[app].[environment].yml
/images
Here we can add the static images which are required by our web app, for example if we require the image favicon.ico we can put it inside this directory so that it can be accessible directly via site_root/favicon.ico
/languages
This languages directory is mapped to wp-content/languages which is responsible for the translation files or the language packs for our website.
For plugin or themes we can add them like -> /languages/plugin-name/plugin-name-locale.mo
/plugins
This directory is mapped to /wp-content/plugins -> This is to add our client third party plugins to the VIP installation, this would be the directory used to load our custom plugins.
/private
This directory is mapped to the root of our installation + ‘/private’, now what this would do is, any data inside this directory would not be publically accessible, but it would be accessible programatically from our plugins or themes, so if we need some data to be accessible by our plugins or themes, we can add it in this directory and then can use it like this
file_get_contents( WPCOM_VIP_PRIVATE_DIR . '/sites.json' );This directory would not be writable by PHP
/themes
This directory is mapped to /wp-content/themes, just like plugins this would be used to load our third party themes to the VIP installation.
We cannot install themes via the WP Admin Dashboard, instead we would have to use the /themes directory to add or remove themes from our WordPress VIP installation.
/vip-config
The vip-config directory contains a file vip-config.php -> this file works similar to like wp-config.php -> if we want to add some constants in our wp-config.php we can use this vip-config.php to do the same.
VIP GO Enviroments
Production
This is the enviroment that would be public for the whole world, this is the environment where the main code of our site would be deployed. [ DON’T PLAY WITH PRODUCTION, IT BREAKS 😀 ]
Preprod
This is the environment where the testing happens before publishing it to the production, this environment has the similar configuration to a production enviroment and is most suited to test before pushing to production.
Develop
This is the non-production enviroment which can be used to test the bugs, functionalities and debug the code.
Local
This is the VIP local environment which can be used to test, develop or fix bugs. [ PLAY TIME ]
Initially, VIP Go provides a production environment only and we need to open a support ticket to ask for development and preprod environments
All these enviroments are connected to github branches, and there we have to deploy the code to get them into action.
VIP Local Development
VIP provides the support of local development via the VIP-CLI, this gives us the best to similar configuration of a VIP platform on our local development to create and test features in our local development environment before publishing them to certain environments.
VIP CLI
VIP CLI is node based, to install VIP CLI we must run the below command
npm install -g @automattic/vipNow we can use the vip command to create a new local development environment
vip dev-env create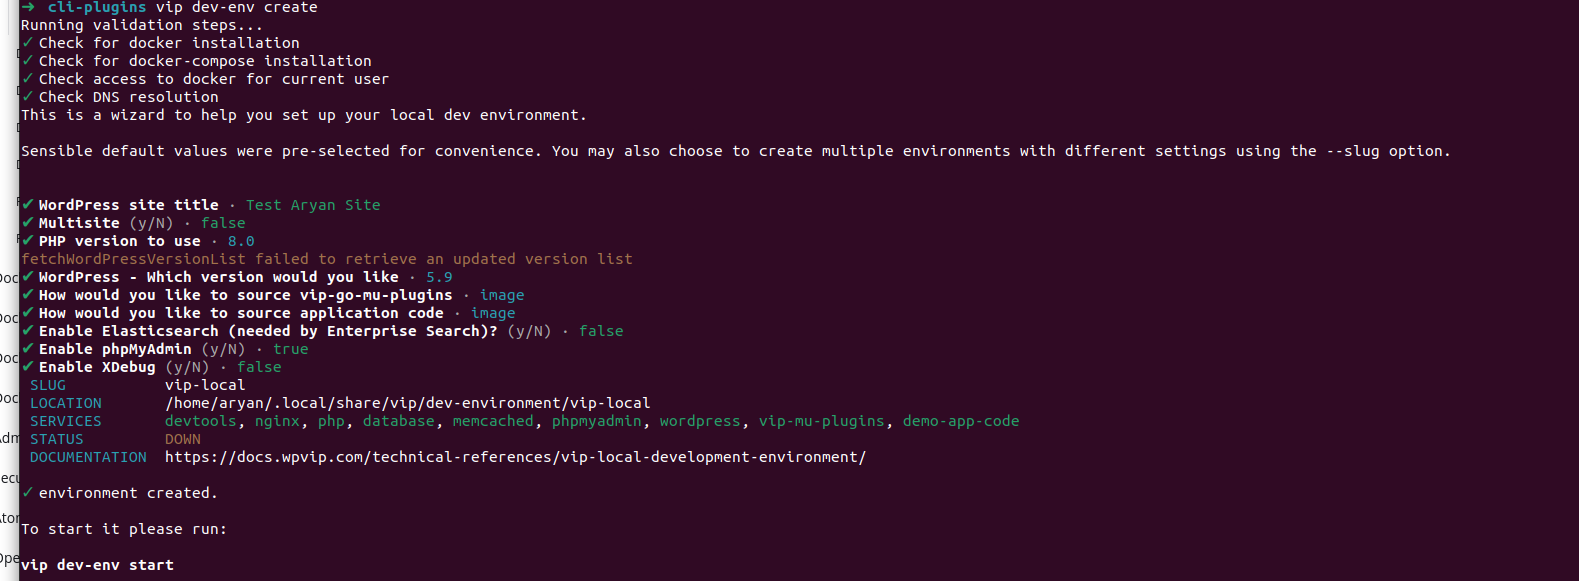
This would ask us for different options and at the end create our dev environment
We can then send the command vip dev-env start to start our dev environment
This command would then launch our dev env and provide us with the locations and URLs to access it

/config